The Service Catalog allows administrators to create and manage a structured list of services and resources available to users. It helps standardize service request management by organizing services under clear categories and defining visibility rules across clients. The Service Catalog provides the following key capabilities:
Multi-level categories: Organize services into up to three levels for easier navigation and scalability.
Visibility management: Control service item access for specific clients, contact groups, or agents.
Shared fields: Reuse common fields across multiple service items to ensure consistency and save setup time.
- Send Service Items for Approval: Agents can send service items for approval to users based on clients, agent groups, or contact groups directly from the ticket.
- Analytics for Service Items: Admins can now select the Service Request ticket type when creating ticket-based reports, enabling better insights into service item performance and usage trends.
- Workflows for Service Requests: Workflows can be created for service requests at both the client and global levels, helping automate processes and improve operational consistency.
TABLE OF CONTENTS
- Create service category
- Create a root service category
- Create a subcategory
- Create a service item
- Manage service categories, subcategories, and items
Create service category
Service categories help organize related service items by their nature or purpose. This structured categorization improves catalog navigation and makes it easier for users to find and request services. You can access the Service Catalog by navigating to:
Admin > Global Settings > Service Management > Service Request Management > Service Catalog.
You can create the following types of categories:
Root category – The top-level category in the catalog. This can contain 2 levels of subcategories.
Subcategory – A nested category under a root or parent category.
Create a root service category
To create a root service category:
Click Create service category at the top-right corner and select Create a root category.
Enter the category name and description, and click Create.
Create a subcategory
You can create subcategories under a root or parent category. The Service Catalog supports up to three levels in the hierarchy.
To create a subcategory:
Click Create service category and select Create a subcategory.
From the Select parent dropdown, choose the relevant root or parent category.
Enter the category name and description.
Click Create to save the subcategory under the selected parent.
Create a service item
You can create any number of service items under a root/parent category, or under a subcategory.:
From the Create dropdown at the top-right corner, select Service Item.
Or, click a service category under Categories and click the Plus icon
Step 2: Enter required details
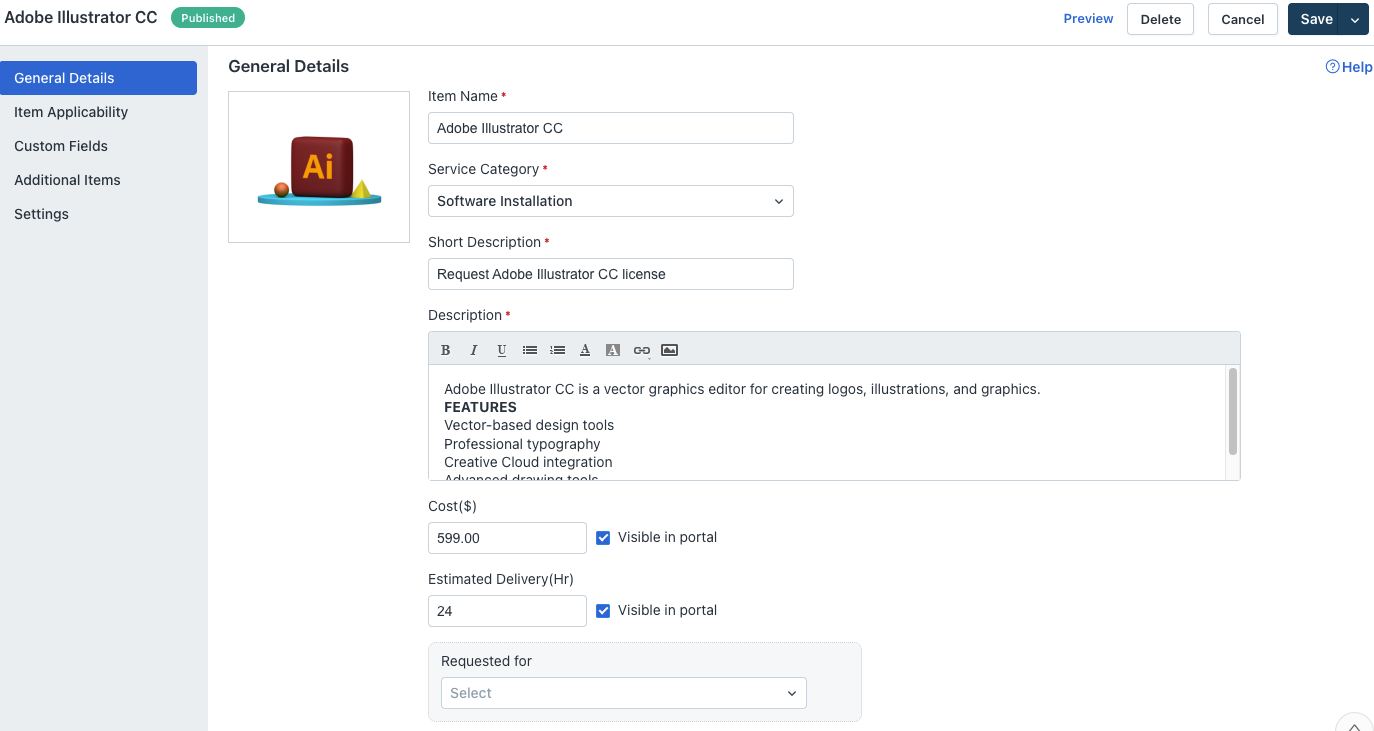
In the General Details section, fill the following fields:
Enter a name in the Item Name field.
Select a relevant category from the Service Category dropdown.
Enter a short description and detailed description in the respective fields.
Enter the cost in USD in the Cost field. If required, select the Visible in portal checkbox.
Enter the estimated delivery in hours in the Estimated Delivery field. If required, select the Visible in portal checkbox.
Select a relevant option from the Requested for dropdown.
Step 3: Select applicability for service items
In the Applicable to drop-down, select one of the following:
None
All clients
Specific clients
In the Contact Visibility drop-down, select one of the following:
All contacts
Contacts Groups
In the Agent Visibility drop-down, select one of the following:
All agents
Agent Groups
Step 4: Add Custom Fields
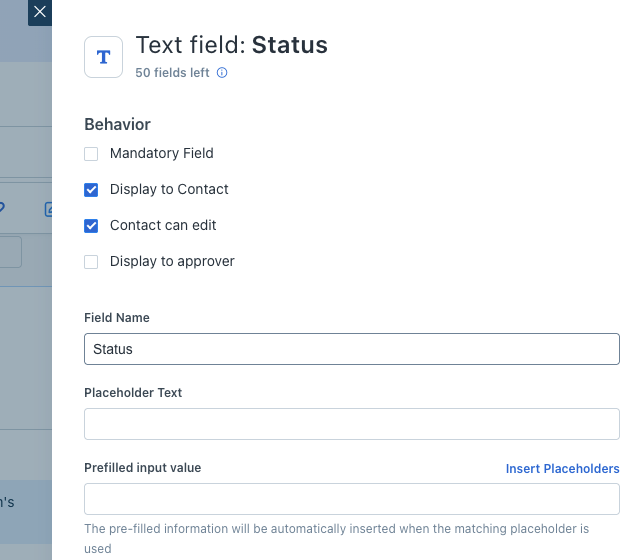
In the Custom Fields section, you can find a range of custom fields, such as text, paragraph text, checkbox, and so on.
Note: You can also add shared fields with the Add shared field option. See Manage Shared Fields for Service Categories and Items for more information.
Drag and drop the required custom fields on the Drag and drop fields here section. For example, select a text field and define the relevant field properties.
Select the access and behavior for custom fields.
Add lookup fields that will populate appropriate field properties and create relevant hierarchical relationships when your end-users fill out their forms. You can use dropdowns to navigate through the data and select different options you’ve configured.
Add content fields to all your incident and service item forms. You can create sections in your forms with content headers, and you can also add relevant links.
Step 5: Additional Items
This enhances the efficiency of service requests by providing the ability to select and request supplementary items. It also eliminates the need for your customers to create multiple requests for different service items. However, additional items must be added individually in the service catalog. This option is not available for loaner service items.
To add related service items that can be requested along with this item:
Search and include related service items that can be requested alongside the main service.
If required, select Mark as mandatory checkbox.
Select the Create Child Requests for each of the items above checkbox if you want individual child tickets to be created for each additional item.
Note: Enabling this option will link the added child tickets to the parent ticket. The child tickets will then be handled by agents in the respective departments, and the items must be delivered within the timeframe under the corresponding SLAs. If this checkbox is not selected, all the items fall under a single service request that can be assigned to just one agent.
Step 6: Service Item settings
Enable Allow Attachments and Show Quantity based on your requirement.
Customize the subject of the service request raised for this item. If required, insert placeholders.
Select Save & Publish from the Save dropdown at the top-right corner to save the service item, or select Save as Draft to revisit later.
Manage service categories, subcategories, and items
You can manage various actions associated with service categories, subcategories, and items, such as updating the name or description, cloning, reordering, moving a category, changing the status, and so on.
Manage service categories and subcategories
Click the edit icon next to the category or subcategory name.
Make the necessary changes, and click Update.
To reorder subcategories, hover over a category name under Categories on the left pane, and select the Reorder subcategories icon.
Click Custom order to reorder the subcategories. Reorder the subcategories (as required), and click Save.
(To delete a service category or subcategory) Click the pen icon next to the category or subcategory name.
Click Delete on the Edit service category dialog that opens.
Then, click Delete on the Delete service category dialog that opens.
Note: Deleting a service category or subcategory will also delete the associated subcategories and service items (if any).
Manage service items
You can manage existing service items in the Service Catalog by performing actions such as cloning, moving, changing status, modifying visibility, or deleting items.
Clone a Service Item
Hover over the required service item and select the Clone icon.
Follow the instructions under Create a Service Item to update the cloned item’s general details, custom fields, and other configurations.
Move a Service Item to a different category
Select the required service item and click Move to Category.
Choose the new category from the dropdown.
Click Move to confirm.
Change the Status of a Service Item
Select the required service item and click Change Status.
In the Change Status dialog, select the desired status.
Click Save to apply the changes.
Modify Service Item Visibility
Select the required service item.
From the Visibility dropdown, choose the desired visibility option.
Click Save to update the visibility settings.
Delete a Service Item
Select the required service item and click Delete.
In the Delete Service Item dialog, click Delete to confirm.


